Life, Death, Kō
For people who tackle Tsumego for the first time, this introduction tries to explain what they are in a simple way. First of all, we need to understand when a group of stones dies.
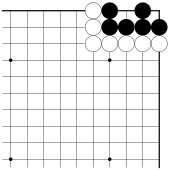
Dia. 1
Have a good look at the black stones. They have two eyes. Try as they might, white can’t catch them, so they are alive.
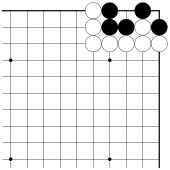
Dia. 2
These black stones have no eyes at all. They are dead.
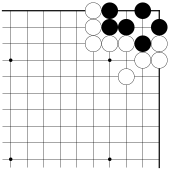
Dia. 3
Here you see a Kō situation. If black can connect, the group is alive. If not, it will die.
Black to play and live
In Tsumego either black or white has the first move. In many collections black moves first in every puzzle to keep it simple, but this is not always the case. Usually who goes first is written next to the puzzle. Kō is often not accepted as solution, but again, this is not always the case. Sometimes the text next to the puzzle specifies the expected outcome, such as ‘black to play and kill’.
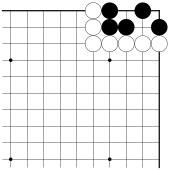
Dia. 4
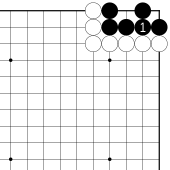
What should black do to live?
Dia. 5
The solution is to connect at 1 in order to prevent a false eye.
Dia. 6
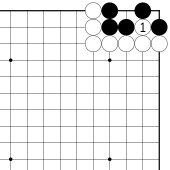
If black chooses to play elsewhere, white 1 kills the black stones.
One solution only
In Tsumego puzzles, there is only one correct variation after the first move. If for example you have to find a way for black to live, there will only be one correct sequence that leads to life. All other variations result in death or Kō. So please be careful!
Dia. 7
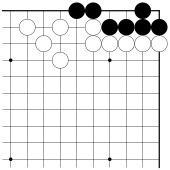
Black to play and live. Do you see the solution?
Dia. 8
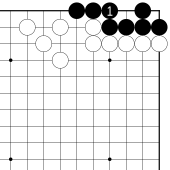
The solution is to play at 1 and make a second eye.
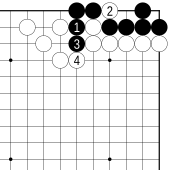
Dia. 9
All other solutions result in a dead group. For example, if black plays at 1, white can throw in at 2. This results in a false eye – the black stones are dead.
Black to play and kill
In this type of puzzle, black must find a way to kill the white stones. Again, there is just one correct solution.
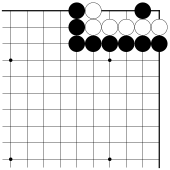
Dia. 10
Think carefully and thoroughly. How can black kill the white stones?
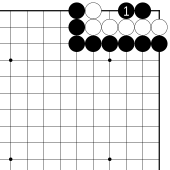
Dia. 11
Playing at 1 prevents white from making two eyes. The white stones are dead, because black can add one more stone at any given time to make a dead shape inside white’s group (Nakate, see below for examples).
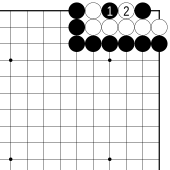
Dia. 12
Black 1 gets captured by white 2 at once. White lives, so this is a failure.
Enduring with Kō
As mentioned earlier, Kō is in most cases not an acceptable solution to a Tsumego. Usually a puzzle should result in unconditional life or death. So same as in real games, you have to try to prevent the opposing side to wiggle out of a sticky situation by creating a Kō.
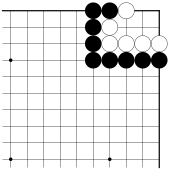
Dia. 13
Have a good look at this situation.
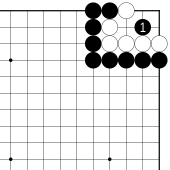
Dia. 14
Black 1 hits the vital point of the dead 5-stone Nakate shape (see below), thus killing the white stones.
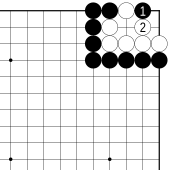
Dia. 15
Playing at 1 on the other hand, allows white to cling to life. Black allowed the creation of a Kō even though it was possible to kill white unconditionally. Therefore this variation counts as a failure.
Life in Seki
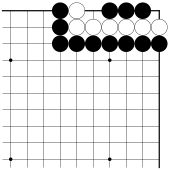
Dia. 16
Look at these white stones. Do you think they can be killed?
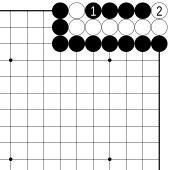
Dia. 17
Black tries to attack by playing at 1. White has to capture with 2.
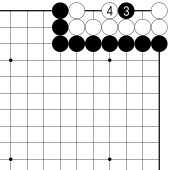
Dia. 18
Next, black finds it impossible to prevent white from making two eyes. 3 and 4 are Miai (two moves that do the same thing). The white stones were never in danger of dying. Seki means life.
Seki and Nakate
There is no other way than practicing over and over again in order to get to a point where you can distinguish between stones that live in Seki and stones that die from Nakate.
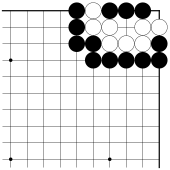
Dia. 19
What about these white stones? Can you see if they are alive or not?
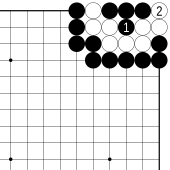
Dia. 20
Black succeeds in killing the white stones by playing at 1. Even if white captures with 2 …
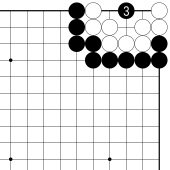
Dia. 21
Black 3 hits the vital point of the 4-stone Nakate shape. Thus white’s stones were already dead in dia. 19.
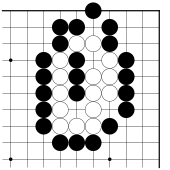
Dia. 22
What about these stones? If you can see whether it is Seki or Nakate, you have acquired the necessary reading skills to solve Tsumego.
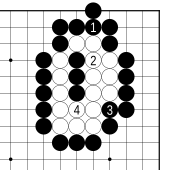
Dia. 23
By removing an outside liberty with 1, black can put the white stones in Atari. White resists by connecting at 2, then has to capture at 4 because black 3 again puts white into Atari.
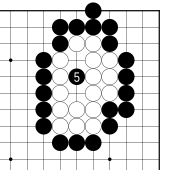
Dia. 24
Finally, black 5 is the vital point of the 3-stone Nakate. So you see that the white stones were already dead in dia. 22.
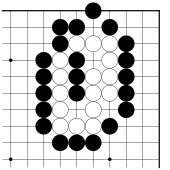
Dia. 25
Have a look at these stones. There is only a minor difference to dia. 22. But are the white stones dead from Nakate, or are they alive in Seki? Let’s find out.
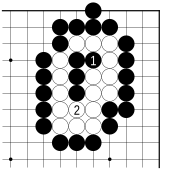
Dia. 26
After removing the outside liberties, black puts the white stones in Atari with 1. White has to capture.
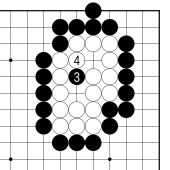
Dia. 27
Even if black places a stone at 3, white can make two eyes with 4. If black starts at 4, white play 3 to get two eyes. Therefore, white was already alive in Seki in dia. 25.
Dead shapes (Nakate)
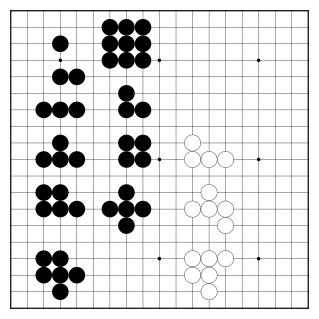
Diagram taken from the book ‘Get Strong at Life and Death’, Kiseido 1997.
The black stones show shapes that kill a surrounding group. In Japanese this is called Nakate or Nakade. By the way, the space inside a group is called Futokoro in Japanese, a word used to describe the space between the skin and the clothes one wears (also the space in a pocket). The white stones are examples of living shapes. Be aware that the shown black shapes not always lead to a dead group. Depending on the number of liberties it might be Seki. Also the shown white shapes don’t have to result in a living group, depending on defects in the surrounding stones.